Tampilkan postingan dengan label up. Tampilkan semua postingan

Minggu, 22 Mei 2016

Blogger provides an option to set up a custom domain to point to your blog. However, There is no common way that this can be done. It depends on where you bought your domain domain.
Many people buy domain names on godaddy, for different reason. We will go through a step by step tutorial on how this process is done.

I have read some tutorials on setting up a custom domain on blogger with +GoDaddy . I noticed that the screen shots are not typical of the current godaddy.com design. This screen shots here are typical of what godaddy.com looks like ,September 2015.

In order to apply this tutorial to you blog, you must have the following
1. a blog hosted on blogger
2. a domain name registered on godaddy.com
          When we talk of setting up a custom domain on blogger, we mean using you own domain name to point to your blog not the way given to you by blogger.

There are two ways this can be done:
 I. on  subdomain for example(sms.ransbiz.com)
You might decide to use a subdomain if you want use your domain name on another website.
For example an oil company that  has a website might want to use blogger to write articles about their service.
if the domain name for the company website is say  ransbiz.com,
the company can choose a subdomain name   blog.ransbiz.com to point to their blog on blogger.

 II. On a top level domain(e.g ransbiz.com)
In this tutorial, i will show you how to set up a top level domain to point to your blogger blog.


 Set up your top Level domain to point to your blog on blogger.
==stetp1
Go to you blogger dashboard==>settings==>basic and click on  set up a third-party url for your blog


 ==STEP2
Enter your domain name (make sure you use www.) and click on save, the following will display on your screen.
You will need the information indicated with the two red lines
==STEP3
Go to your godaddy account and fine your way to my domais tabs ===>Click manage.
If you can  not do it, then follow the screen shot below(Note that there are several ways to do this )
==STEP4

 Click on the domain name you want to use ==> Click on DNS Zone File


Scroll down to where you see CNAME(Alias)


 under host you will see www  already wriiten.
click on the pencil icon to edit. Under point to, type
ghs.google.com(you can remove whatever is written there)
If you cannot find www already typed under Host, Follow the instructions in the next steps. Make sure you have something like this.
                              HOST                                      Point to
                              www                                       ghs.google.com

 ==STEP5
We have used the first CNAME indiacted on step 2
To enter the second CNAME(See second RED line on step 2)

Click on Add Record at the top==>select CNAME as on the screen shot above   and input the following

In the field for host
Copy and paste  info1 (step2)
Also copy and paste info2.googlehosted.com into the point to field.
Click on Finnish when you are done.
make sure you click on save on the red tab.
At this point we have directed our custom domain to a blogger blog. But we will receive errors when someone type your domain name without the www.
STEP6
To enable this, go to add record==>selecet  A (Host) and enter the following IPs.
Host            Point to
@
      216.239.32.21
@
      216.239.34.21
@
      216.239.36.21
@
      216.239.38.21


After entering the first click on add another untill all the 4 IPs are entered.
Then clik on finnish and again click on save changes displayed in Red.
      At this point, return to your blogger and Click on save.
Your will see the domain name displayed.

Click on edit beside the domain name and  Select the box displaying something like this.
 
                         Your can now enjoy your custom domain on blogger.
Have you set up a custom domain with another host? Share with us how easy it was.
Read More..

Kamis, 12 Mei 2016

**This post contains affiliate links and I will be compensated if you make a purchase after clicking through my links.

Whether we like it or not, summer is quickly coming to a close. Cricut is having a Summer Blowout Sale with incredible deals on titles that you wont want to miss. From the Stretch Your Imagination Wedding Digital Set (now just $3.33) that will keep you covered for many wedding seasons to come, to the Giant Flowers Cartridge with beautiful blooms that will stay vibrant year-round, Cricuts Summer Blowout sale is the perfect time to stock up on titles youll be glad to have year after year.

Be sure to take advantage of this huge sale today and get straight to work trying out your new Cricut titles!

Happy crafting!
Read More..

Minggu, 08 Mei 2016

Its is very important for anyone running a blog on blogger to always back up their blogs. This is because once you go against Google terms and policy, the blog is deleted without requesting any explanations from you. If you blog is backed up you can host it on word press which stand as the best alternative to blogger.
This three step tutorial will help you keep your blog safe.
          If you cannot follow the screen shot the read the step after the picture


I

 Go to Blogger.com  Settings ==> Other== > Export your blog.
II

  select the orange “Download Blog” button  from the pop up window and a file will be downloaded which would be in “XML” format.
II

You can save the file in on your hard drive or  clouds like Google drive,one drive,and drop box.
                    
WHAT IF I WANT TO BACK THE TEMPLATE ONLY?         
   Here is what to do:
Go to blogger dashboard
==> Click on template
==>click back up at the top right
==>click download full template 
==>END .
Here is what it should look like

Make sure you open the download folder and copy the XML document to a safe place.


Read More..

Sabtu, 30 April 2016

How To Set Up A Website Conversions Ad many friends dont know about this  Facebook Advertising Guide, After sharing on Facebook Analytics Free Tool and  What is Facebook Insights and How to use  Guide and  today we are giving you complate guide series of Facebook advertising. As most of you guys know that Facebook is well known social networking website which is used by business persons in order to promote their business. Such people get more clients or promoting their business through Facebook advertising. So in this article we are going to talk how to setup a website conversion ad easily.

Setting up conversion tracking

The best type which seems to be great is considered as “Conversion Tracking”. Conversion tracking allows these people to optimize their advertisements for other people who will take specific action on your blog or website or landing page.

Dont Miss - How to Submit My Facebook Page for Verification For Logo

 Set Up Website Conversions Ad Facebook Advertising Guide image photo

Type of Product/Business Conversions

Such type of specific actions may be filling out specific form on your website or allowing Facebook people to join your mail listing or to buy any kind of specific product which you are promoting. The best thing is that Facebook will only target these ads for all those people who already have take action for that particular stuff which you are promoting through Facebook ads such as those people who have subscribed to a specific email list or those specific people which have bought products in the past.

Dont Miss - How To Do Marketing on Facebook For Free

The main thing for measuring these conversions, you will need to setup tracking pixel within Facebook and then you will need to add it within <head></head>  section of that particular web page on your website or which you want to  be tracked or for the page from which you want to get conversion information easily by tracking.
Such page can by thank you for buying this product or may be about page or may be thanks for subscribing or may be some kind of specific landing page which is hidden on your website or blog. The video mentioned below will guide you how to set up a tracking pixel for specific page.
(video code)

Step to step Guide on Setup Pixel in Your Site for Track


  • First you must login with your faceboook Account.


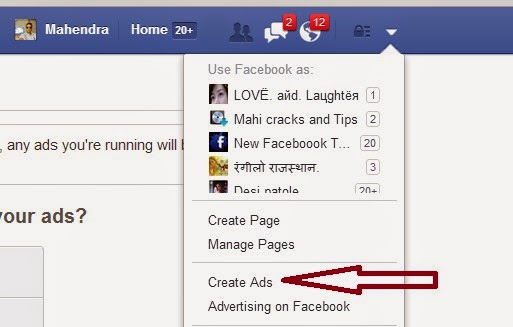
  • Now on upper right corner, click on setting gear and scroll down


How To Set Up Website Conversions Ad Facebook Advertising image photo


  • After scroll down you will see Create ads option just click on Create ads.


Website Conversions Ad Facebook Advertising image photo


  • Now just click on website conversation, Then you will see a box.


  • Now just fill your site and choose categoty Key web Page Views.


Website Conversions Ad Facebook Advertising image photo


  • After choose a Category name just give a any name and click on  create Pixel.


  • Now just click on I can add the pixel to my website


  • After this you will see codes just add it on <head></head>  section.


Dont Miss - How To Invite all friends on Facebook event in one click Chrome

Video Tutorial


How To Track Conversions with a Tricks Pixel


Setting up a tracking pixel is a little bit tricky method. In the above is clearly shown about the setting up process and ad created. Mainly genesis framework is used on that particular website mentioned in the video which provide an opportunity by default to add code to the header section of individual pages on WordPress websites or blogs.  All we need to do is to scroll down below the page or page which we are creating and there is a box in which we will be going to add code. Have a look at this image mentioned below:

If you are using the WordPress platform for such purposes, but not using genesis framework, then you should need to try out “Per page add to head ” plugin which will help the users to perform the same thing.

Setting up conversion tracking in google analytics

If you are not using WordPress platform or don’t want to mess with the code on your blog or website then you should need to forward that particular code to your developer or you can also use a regular website  ad and also can use your own tracking code. The main thing which you will loose will be Facebook targeting for your business or product, etc but still  you will be able to measure conversions in Google analytics easily.

I hope you liked this Facebook Advertising informative guide on how to setup a website conversions ad. If you have any suggestion or question regards this guide, feel free to ask in comments section. For more Facebook Advertising Guide keep visit.


Read More..

Selasa, 12 April 2016

Have you seen the latest trend in coloring books?  Images that even the grown ups will enjoy!  If you used to like to lay on the floor in your pajamas coloring as a kid, then you should check out some of these grown up books.


Natural Wonders Color Art Coloring Book Floral Wonders Adult Coloring Book Adult Coloring Book - BIG
Read More..

Kamis, 07 April 2016

Have you ever pulled cardstock off of a REALLY sticky Cricut mat to have it curl up on you?  Below is a photo of some cardstock I used for a recent project, and you can see how the portion that I peeled off of the mat has a curve in it now.


Yes, I can place it between some heavy books and get it to lay flat again at some point, but I also found something out . . . it is all about how you remove things that causes that curve/curling to happen.  

Most of us would use our spatula to pull up the excess paper, as shown in the photo below, and peel that away leaving the image we cut on the mat.


I found out recently that this is not the best way to remove the cardstock when that mat is SUPER sticky.


The BETTER way is to peel back the mat.


Below is a photo of two pieces where I peeled back the mat instead of the cardstock . . . see how the remaining cardstock is still nice and flat!  If you are making very large cuts it is also better to peel the mat away so that your cuts do not curl up. 


I plan to do another post about this showing the exact same cuts side by side, but peel the cardstock back on one and peel the mat back on the other.  I think that will really show the difference in the technique.


Read More..

Kamis, 31 Maret 2016

My niece needed her name on her backpack, and since I have a Brother sewing/embroidery machine can also embroider my sister asked if I could help out.   Here is a photo of the backpack.  The problem was that the backpack did have a rigid frame, so it made it hard to get into the embroidery arm of my machine.


Instead of embroidering right on the bag, I decided to make a patch that I could sew onto the bag.  I used some black Oly Fun fabric from Fairfeld for this project.  I knew that Oly Fun would be the perfect fabric to use since it is great for indoor and outdoor use.  I did not want to have to worry about snow or rain getting on this patch.  Also, this fabric will not fray so there is no worry of the edges of the patch getting messed up.


The fabric was a great texture and weight to embroider on.  I decided to embroider an oval and then put my nieces name inside the oval.  Once I finished the embroidery stitching I trimmed away the extra threads and cut around the outside of the oval, close to the stitching lines.


I secured the patch with some fabric glue in the center, just to hold it in place while I hand stitched around the outer edge.  I think that since I used the black it looks like I embroidered right on the bag and it does not look like a patch.

Read More..

Rabu, 30 Maret 2016

How To Get More From Facebook Boost Post Target It tutorial and which one is better Promoted Posts or Boosts Post many friends need, After sharing on How To Set Up Website Conversions Ad Facebook Advertising Guide today we are talking about this, In previous article, I wrote a detailed guide about how to setup a website conversion ad which is really helpful for business person or for those people who want to get targeted customers for their particular product from Facebook and keep tracking of conversions from Facebook. In this article we are going to discuss how to get more from Facebook . Now if you are not ready for the ads manager, still there are several other methods through which you can save a lot of your money on Facebook ads which you already have setup on your timeline.

Dont Miss - How To use Facebook for Business promotion

How To Get More From Boost Post of Facebook with Target

How to Get More from Facebook 

If you are regular Facebook user, you might have seen sponsored post section in your feeds which most of the online people are using for their product or business promotion. Facebook “Boost post” option is considered as one of the best method to reach more targeted customers through your updates, you might be wasting most of your advertising money/budget on reaching more people on Facebook which don’t seems to be interested in your product or service which you are promoting or to those people who have no buying power.
The video mentioned below shows you how you can easily setup a simple targeting using “Boost Post” option. It is one of the simple method and also you will be able to find out that you can get more interaction through this method when you will target right audience.

Dont Miss - How To Boost Facebook Page Get Likes Free Fast more 2014 


 When Targeting Goes Wrong


Don’t be such type of person. Sometime I either get annoyed or  disappointed after seeing this type of advertisements on my own newsfeed. It’s totally wastage of your money on such advertising and it totally lacks for getting targeted audience. The company promoting the ad shown in the above image is paying for ad to shown in my news feed.

Dont Miss - Facebook Online Marketing Tips and Tricks 2014


How To Get More From Boost Post of Facebook with Target image photo

Boosts Post or Promoted Posts, which one is better?

Some people get confused when promoting their business or products online. They don’t have any idea which will be best way either Boosts posts or promoted posts. Many marketers currently using Boost option because it is really easy for them and accessible. Also it is located on right side of your page’s timeline and can be setup in two clicks easily. But it will not be the best option for reaching the perfect audience.

According to my opinion, most of the people are still using promoted posts option and is best way for them to get more from Facebook because it allows them to have more control over those people who sees their ads in their newsfeed and also how you pay for this method. Now it depends upon you which method you are going to select for getting right audience.

Don’t Let Your Boosted Post Get Rejected

Back to our main topics, always keep in mind that if you want to boost a post on Facebook, it must be containing an image which contains twenty percent text which attracts right audience/people. I hope this guide will be helpful for you in getting more audience from Facebook “Boost Posts” option. If you have any questions or suggestions regard this guide, feel free to ask in comments section. Thanks for visit and keep it for New Facebook boost guide and many more Ads tips of this social networking site.

Read More..